How to Make Solar Cooker/Cooler
by Steven E. Jones, Professor of Physics at Brigham Young University (BYU),
with Colter Paulson, Jason Chesley, Jacob Fugal, Derek Hullinger, Jamie Winterton, Jeannette Lawler, and Seth, David, Nathan, and Danelle
Jones.
Introduction

A few years ago, I woke up to the fact that half of the world's peoples must burn wood or dried dung in order to cook their food. It came as quite a shock to me, especially as I learned of the illnesses caused by breathing smoke day in and day out, and the environmental impacts of deforestation -not to mention the time spent by people (mostly women) gathering sticks and dung to cook their food. And yet, many of these billions of people live near the equator, where sunshine is abundant and free. Ergo...
As a University Professor of Physics with a background in energy usage, I set out to develop a means of cooking food and sterilizing water using the free energy of the sun. First, I looked at existing methods.
The parabolic cooker involves a reflective dish that concentrates sunlight to a point where the food is cooked. This approach is very dangerous since the sun's energy is focused to a point which is very hot, but which cannot be seen. (BYU students and I built one which will set paper on fire in about 3 seconds!) I learned that an altruistic group had offered reflecting parabolas to the people living at the Altiplano in Bolivia. But more than once the parabolas had been stored next to a shed -- and the passing sun set the sheds on fire! The people did not want these dangerous, expensive devices, even though the Altiplano region has been stripped of fuel wood.
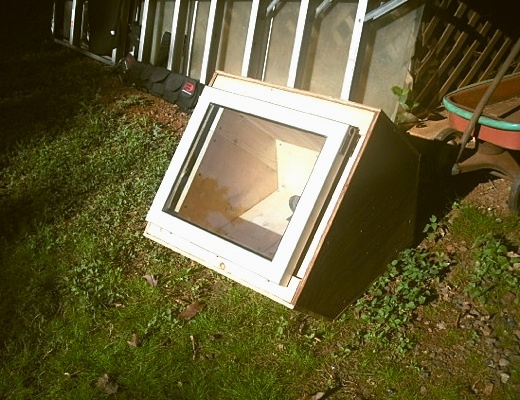
The box cooker: Basically an insulated box with a glass or plastic lid, often with a reflecting lid to reflect sunlight into the box. Light enters through the top glass (or plastic), to slowly heat up the box. Problems: energy enters only through the top, while heat is escaping through all the other sides, which have a tendency to draw heat away from the food. When the box is opened to put food in or take it out, some of the heat escapes and is lost. Also, effective box cookers tend to be more complicated to build than the funnel cooker.
While studying this problem, I thought again and again of the great need for a
safe,
inexpensive yet
effective solar cooker. It finally came to me at Christmastime a few years ago, a sort of hybrid between the parabola and a box cooker. It looks like a large, deep funnel, and incorporates what I believe are the best features of the parabolic cooker and the box cooker.
The first reflector was made at my home out of aluminum foil glued onto cardboard, then this was curved to form a reflective funnel. My children and I figured out a way to make a large card-board funnel easily. (I'll tell you exactly how to do this later on.)
The Solar Funnel Cooker is safe and low cost, easy to make, yet very effective in capturing the sun's energy for cooking and pasteurizing water -> Eureka!
Later, I did extensive tests with students (including reflectivity tests) and found that aluminized Mylar was good too, but relatively expensive and rather hard to come by in large sheets. Besides, cardboard is found throughout the world and is inexpensive, and aluminum foil is also easy to come by. And individuals can make their own solar cookers easily, or start a cottage-industry to manufacture them for others.
Prototypes of the Solar Funnel Cooker were tested in Bolivia, and outperformed an expensive solar box cooker and a "Solar Cookit" - while costing much less. Brigham Young University submitted a patent application, mainly to insure that no company would prevent wide distribution of the Solar Funnel Cooker. BYU makes no profit from the invention. ( I later learned that a few people had had a similar idea, but with methods differing from those developed and shown here.) So now I'm trying to get the word out so that the invention can be used to capture the free energy of the sun - for camping and for emergencies, yes, but also for every day cooking where electricity is not available and even fuel wood is getting scarce.
How it Works
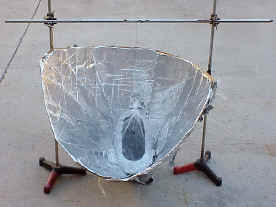
The reflector is shaped like a giant funnel, and lined with aluminum foil. (Easy to follow instructions will be given soon.) This funnel is rather like the parabolic cooker, except that the sunlight is concentrated along a line (not a point) at the bottom of the funnel. You can put your hand up the bottom of the funnel and feel the sun's heat, but it will not burn you.
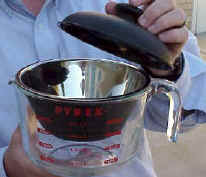
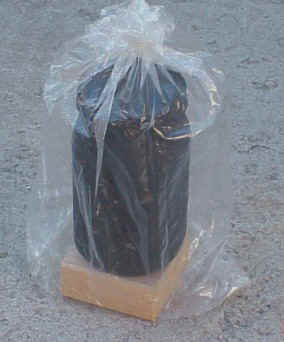
Next, we paint a jar black on the outside, to collect heat, and place this at the bottom of the funnel. Or one can use a black pot, with a lid. The black vessel gets hot, fast. But not quite hot enough to cook with... We need some way to build up the heat without letting the air cool it. So, I put a cheap plastic bag around the jar -- voila, the solar funnel cooker was born! The plastic bag, available in grocery stores as a "poultry bag", replaces the cumbersome and expensive box and glass lid of the solar box ovens. You can use the plastic bags used in American stores to put groceries in, as long as they let a lot of sunlight pass. (Dark- colored bags will not do.)
I recently tested a bag used for fruits and vegetables, nearly transparent and available free at American grocery stores, that works great. This is stamped "HDPE" for high-density polyethylene on the bag (ordinary polyethylene melts too easily). A block of wood is placed under the jar to help hold the heat in. (Any insulator, such as a hot pad or rope or even sticks, will also work.)
A friend of mine who is also a Physics Professor did not believe I could actually boil water with the thing. So I showed him that with this new "solar funnel cooker," I was able to boil water in Utah in the middle of winter! I laid the funnel on its side since it was winter and pointed a large funnel towards the sun to the south. I also had to suspend the black cooking vessel -- rather than placing it on a wooden block. This allows the weaker sun rays to strike the entire surface of the vessel.
Of course, the Solar Funnel works much better outside of winter days (when the UV index is 7 or greater). Most other solar cookers will not cook in the winter in northern areas (or south of about 35 degrees, either).
I thought that a pressure cooker would be great. But the prices in stores were way too high for me. Wait, how about a canning jar? These little beauties are designed to relieve pressure through the lid -- a nice pressure cooker. And cooking time is cut in half for each 10º C we raise the temperature (Professor Lee Hansen, private communication). I used one of my wife's wide-mouth canning jars, spray-painted (flat) black on the outside, and it worked great. Food cooks faster when you use a simple canning jar as a pressure cooker. However, you can also put a black pot in the plastic bag instead if you want. But don't use a sealed container with no pressure release like a mayonnaise jar -- it can break as the steam builds up! (I've done it.)
How to Build Your Own Solar Funnel Cooker
What You will Need for the Funnel Cooker:
- A piece of flat cardboard, about 2 feet wide by 4 feet long. (The length should be just twice the width. The bigger, the better.)
- Ordinary aluminum foil.
- A glue such as white glue (like Elmer's glue), and water to mix with it 50-50. Also, a brush to apply the glue to the cardboard (or a cloth or paper towel will do). Or, some may wish to use a cheap "spray adhesive" available in spray cans. You can also use wheat paste.
- Three wire brads-- or small nuts and bolts, or string to hold the funnel together.
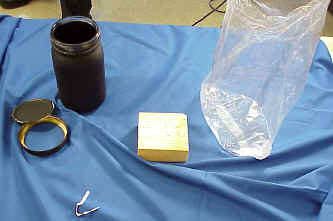
- For a cooking vessel, I recommend a canning jar ("Ball" wide-mouth quart jars work fine for me; the rubber ring on the lid is less likely to melt than for other jars I've found. A two-quart canning jar is available and works fine for larger quantities of food, although the cooking is somewhat slower.).
- The cooking jar (or vessel) should be spray-painted black on the outside. I find that a cheap flat-black spray paint works just fine. Scrape off a vertical stripe so that you have a clear glass "window" to look into the vessel, to check the food or water for boiling.
- A block of wood is used as an insulator under the jar. I use a piece of 2"X4" board which is cut into a square nominally 4" x 4" by about 2" thick. (10cm square x 5cm thick.) One square piece of wood makes a great insulator.
- A plastic bag is used to go around the cooking-jar and block of wood, to provide a green-house effect. Suggestions:
- Reynolds™ Oven Bag, Regular Size works great: transparent and won't melt. (Cost about 25 cents each in U.S. grocery stores.)
- Any nearly-transparent HDPE bag (High-density Polyethylene). Look for "HDPE" stamped on the bag. I've tested HDPE bags which I picked up for free at my grocery store, used for holding vegetables and fruits. These are thin, but very inexpensive. Tested side-by-side with an oven bag in two solar funnels, the HDPE bag worked just as well! (Caution: we have found that some HDPE bags will melt should they contact the hot cooking vessel. For this reason, we recommend using the oven-safe plastic bag wherever possible.)
-
 An idea attributed to Roger Bernard and applied now to the BYU Funnel Cooker: place a pot (having a blackened bottom and sides) in a glass bowl, and cover with a lid. Try for a tight fit around the bottom to keep hot air trapped inside. The metal pot or bowl should be supported around the rim only, with an air space all around the bottom (where the sunlight strikes it). Put a blackened lid on top of the pot. Then simply place this pot-in-bowl down in the bottom of the funnel - no plastic bag is needed! This clever method also allows the cook to simply remove the lid to check the food and to stir. I like this idea - it makes the solar cooker a lot like cooking over a fire. See Photographs for further details.
Construction Steps
Cut a Half-circle out of the Cardboard

Cut a half circle out of the cardboard, along the bottom as shown below. When the funnel is formed, this becomes a full-circle and should be wide enough to go around your cooking pot. So for a 7"
diameter cooking pot, the
radius of the half-circle is 7". For a quart canning jar such as I use, I cut a 5" radius half-circle out of the cardboard.
Form the Funnel


To form the funnel, you will bring side A towards side B, as shown in the figure. The aluminum foil must go on the INSIDE of the funnel. Do this slowly, helping the cardboard to the shape of a funnel by using one hand to form creases that radiate out from the half-circle. Work your way around the funnel, bending it in stages to form the funnel shape, until the two sides overlap and the half-circle forms a complete circle. The aluminum foil will go on the INSIDE of funnel. Open the funnel and lay it flat, "inside up", in preparation for the next step.
Glue Foil to Cardboard
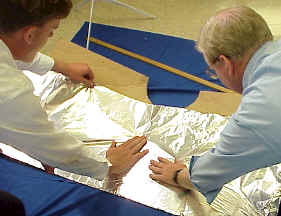
Apply glue or adhesive to the top (inner) surface of the cardboard, then quickly apply the aluminum foil on top of the glue, to affix the foil to the cardboard. Make sure the shiniest side of the foil is on top, since this becomes your reflective surface in the Funnel. I like to put just enough glue for one width of foil, so that the glue stays moist while the foil is applied. I also overlap strips of foil by about 1" ( or 2 cm). Try to smooth out the aluminum foil as much as you reasonably can, but small wrinkles won't make much difference. (If even cardboard is not available, one can simply dig a funnel-shaped hole in the ground and line it with a reflector, to make a fixed solar cooker for use at mid-day.)
Join side A to side B to keep the funnel together.
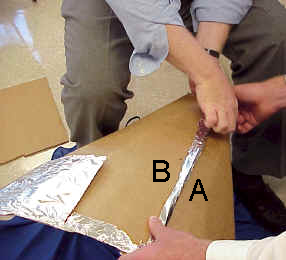
The easiest way to do this is to punch three holes in the cardboard that line up on side A and side B (see figure). Then put a metal brad through each hole and fasten by pulling apart the metal tines. Or you can use a nut-and-bolt to secure the two sides (A & B) together.
Be creative here with what you have available. For example, by putting two holes about a thumb-width apart, you can put a string, twine, small rope, wire or twist-tie in one hole and out the other, and tie together.
When A and B are connected together, you will have a "funnel with two wings". The wings could be cut off, but these help to gather more sunlight, so I leave them on.
Tape or glue a piece of aluminum foil across the hole at the bottom of the funnel, with shiny side in.
This completes assembly of your solar funnel cooker.
For stability, place the Funnel inside a cardboard or other box to provide support. For long-term applications, one may wish to dig a hole in the ground to hold the Funnel against strong winds.
Final Steps
At this stage, you are ready to put food items or water into the cooking vessel or jar, and put the lid on securely. (See instructions on food cooking times, to follow.)
Place a wooden block in the INSIDE bottom of the cooking bag. I use a piece of 2X4 board which is cut into a square nominally 4"X4" by about 2" thick. Then place the cooking vessel containing the food or water on top of the wooden block, inside the bag.
Next, gather the top of the bag in your fingers and
blow air into the bag, to inflate it. This will form a small "greenhouse" around the cooking vessel, to trap much of the heat inside. Close off the bag with a tight twist tie or wire. Important: the bag should not touch the sides or lid of the cooking vessel. The bag may be called a "convection shield," slowing convection-cooling due to air currents.
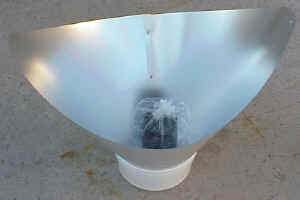
Place the entire bag and its contents inside the funnel near the bottom as shown in the Photographs.
Place the Solar Funnel Cooker so that it Faces the Sun
Remember: Sunlight can hurt the eyes: Please wear sunglasses when using a Solar Cooker! The Funnel Cooker is designed so that the hot region is deep down inside the funnel, out of harm's way.
Put the Solar Funnel Cooker in the sun pointing towards the sun, so that it captures as much sunlight as possible. The design of the funnel allows it to collect solar energy for about an hour without needing to be re-positioned. For longer cooking times, readjust the position of the funnel to follow the sun's path.
It helps to put the Solar Funnel Cooker in front of a south-facing wall or window (in the Northern Hemisphere) to reflect additional sunlight into the funnel. A reflective wall is most important in locations farther from the equator and in winter. In the Southern Hemisphere, put the Solar Funnel Cooker in front of a North-facing wall or window to reflect additional sunlight into your cooker.
After Cooking
Remember that the cooking vessel will be very hot: Use cooking pads or gloves when handling! If you are heating water in a canning jar, you may notice that the water is boiling when the lid is first removed - it gets very hot!
Open the plastic cooking bag by removing the twist-tie. Using gloves or a thick cloth, lift the vessel out of the bag and place it on the ground or table. Carefully open the vessel and check the food, to make sure it has finished cooking. Let the hot food cool before eating.
Helpful Hints
- Avoid leaving fingerprints and smudges on the inside surface of the cooker. Keep the inner surface clean and shiny by wiping occasionally with a wet towel. This will keep the Solar Funnel Cooker working at its best.
- If your funnel gets out-of-round, it can be put back into a circular shape by attaching a rope or string between opposite sides which need to be brought closer together.
- For long-term applications, a hole in the ground will hold the Funnel Cooker securely against winds. Bring the funnel inside or cover it during rain storms.
- The lids can be used over and over. We have had some trouble with the rubber on some new canning-jar lids becoming soft and "sticky." "Ball canning lids" do not usually have this problem. Running new lids through very hot water before the first use seems to help. The lids can be used over and over if they are not bent too badly when opened (pry off lid carefully).
- The jar can be suspended near the bottom of the funnel using fishing line or string (etc.), instead of placing the jar on a block of wood. A plastic bag is placed around the jar with air puffed inside, as usual, to trap the heat. The suspension method allows sunlight to strike all surfaces of the jar, all around, so that heats faster and more evenly. This suspension method is crucial for use in winter months.
- Adjust the funnel to put as much sunlight onto the cooking jar as possible. Look at the jar to check where the sunlight is hitting, and to be sure the bottom is not in the shadows. For long cooking times (over about an hour), readjust the position of the funnel to follow the sun's path. During winter months, when the sun is low on the horizon (e.g., in North America), it is helpful to lay the funnel on its side, facing the sun.
 Tests in Utah
I have personally used the Solar Funnel Cooker to cook lunches over many weeks. My favorite foods to cook are potatoes (cut into logs or slices) and carrot slices. Vegetables cook slowly in their own juices and taste delicious. I also make rice, melted cheese sandwiches, and even bread in the Solar Funnel Cooker. I usually put the food out around 11:30 and let it cook until 12:45 or 1 pm, just to be sure that it has time to cook. I've never had any food burn in this cooker.
I have also cooked food in the mountains, at an altitude of around 8,300 feet. If anything, the food cooked faster there - the sunlight filters through less atmosphere at high altitudes.
I find that people are surprised that the sun alone can actually cook food. And they are further pleasantly surprised at the rich flavors in the foods which cook slowly in the sun. This inexpensive device does it!
Students at Brigham Young University have performed numerous tests on the Solar Funnel Cooker along with other cookers. We have consistently found much faster cooking using the Solar Funnel Cooker. The efficiency/cost ratio is higher than any other solar cooking device we have found to date. Mr. Hullinger also performed studies of transmissivity, reflectivity and absorptivity of alternate materials which could be used in the Solar Funnel Cooker. While there are better materials (such as solar-selective absorbers), our goal has been to keep the cost of the Solar Cooker as low as possible, while maintaining safety as a first priority.
Tests in Bolivia
The BYU Benson Institute organized tests between the Solar Funnel Cooker and the "old-fashioned" solar box oven. The solar box oven cost about $70 and was made mostly of cardboard. It took nearly two hours just to reach water pasteurization temperature. The Bolivian report notes that "food gets cold every time the pots are taken from and into the oven." The solar box oven failed even to cook boiled eggs. (More expensive box cookers would hopefully work better.)
An aluminized-mylar Solar Funnel Cooker was also tested in Bolivia, during the Bolivian winter. Water pasteurization temperature was reached in 50 minutes, boiled eggs cooked in 70 minutes, and rice cooked in 75 minutes. The Bolivian people were pleased by the performance. So were we! (La Paz, Bolivia, August, 1996)
I also donated two dozen solar funnel cookers for people in Guatemala. These were taken there by a group of doctors going there for humanitarian service. The people there also liked the idea of cooking with the sun's free energy! For an aluminized-Mylar Solar Funnel Cooker kit, please contact CRM (licensed manufacturer) at +1 (801) 292-9210.
Water and Milk Pasteurization
Contaminated drinking water or milk kills thousands of people each day, especially children. WHO reports that 80% of illnesses in the world are spread through contaminated water. Studies show that heating water to about 65º - 70º C (150º F) is sufficient to kill coliform bacteria, rotaviruses, enteroviruses and even Giardia. This is called pasteurization.
Pasteurization depends on how hot and how long water is heated. But how do you know if the water got hot enough? You could use a thermometer, but this would add to the cost, of course. When steam leaves the canning jar (with lid on tight) and forms "dew" on the inside of the cooking bag, then the water is probably pasteurized to drink. (The goal is to heat to 160º Fahrenheit for at least six minutes.) With a stripe of black paint scraped off the jar, one can look through the bag and into the jar and see when the water is boiling - then it is safe for sure.
Think of all the lives that can be saved simply by pasteurizing water using a simple Solar Cooker! (See also Recent Advances in Solar Water Pasteurization)
Safety
Safety was my first concern in designing the Solar Funnel Cooker, then came low cost and effectiveness. But any time you have heat you need to take some precautions.
- The cooking vessel (jar) is going to get hot, else the food inside won't cook. Let the jar cool a bit before opening. Handle only with gloves or tongs.
- Always wear dark glasses to protect from the sun's rays. We naturally squint, but sunglasses are important.
- Keep the plastic bag away from children and away from nose and mouth to avoid any possibility of suffocation.
Cooking with the Solar Funnel Cooker
What do you cook in a crock pot or moderate-temperature oven? The same foods will cook about the same in the Solar Funnel Cooker -- without burning. The charts below give approximate summer cooking times.
The solar cooker works best when the UV index is 7 or higher. (Sun high overhead, few clouds.)
Cooking times are approximate. Increase cooking times for partly-cloudy days, sun not overhead (e.g., wintertime) or for more than about 3 cups of food in the cooking jar.
Stirring is not necessary for most foods. Food generally will not burn in the solar cooker.
Vegetables (Potatoes, carrots, squash, beets, asparagus, etc.)
Preparation: No need to add water if fresh. Cut into slices or "logs" to ensure uniform cooking. Corn will cook fine with or without the cob.
Cooking Time: About 1.5 hours
Cereals and Grains (Rice, wheat, barley, oats, millet, etc.)
Preparation: Mix 2 parts water to every 1 part grain. Amount may vary according to individual taste. Let soak for a few hours for faster cooking. To ensure uniform cooking, shake jar after 50 minutes.
CAUTION: Jar will be hot. Use gloves or cooking pads.
Cooking Time: 1.5-2 hours
Pasta and Dehydrated Soups
Preparation: First heat water to near boiling (50-70 minutes). Then add the pasta or soup mix. Stir or shake, and cook 15 additional minutes.
Cooking Time: 65-85 minutes
Beans
Preparation: Let tough or dry beans soak overnight. Place in cooking jar with water.
Cooking Time: 2-3 hours
Eggs
Preparation: No need to add water.
Note: If cooked too long, egg whites may darken, but taste remains the same.
Cooking Time: 1-1.5 hours, depending on desired yolk firmness.
Meats (Chicken, beef, and fish)
Preparation: No need to add water. Longer cooking makes the meat more tender.
Cooking Time: Chicken: 1.5 hours cut up or 2.5 hours whole; Beef: 1.5 hours cut up or 2.5-3 hours for larger cuts; Fish: 1-1.5 hours
Baking
Preparation: Times vary based on amount of dough.
Cooking Times: Breads: 1-1.5 hours; Biscuits: 1-1.5 hours; Cookies: 1 hour
Roasted Nuts (Peanuts, almonds, pumpkin seed, etc.)
Preparation: Place in jar. A little vegetable oil may be added if desired.
Cooking Time: About 1.5 hours
MRE's and prepackaged foods
Preparation: For foods in dark containers, simply place the container in the cooking bag in place of the black cooking jar.
Cooking Times: Cooking time varies with the amount of food and darkness of package.
How to Use the Solar Funnel as a Refrigerator/Cooler
A university student (Jamie Winterton) and I were the first to demonstrate that the BYU Solar Funnel Cooker can be used - at night - as a refrigerator. Here is how this is done.
The Solar Funnel Cooker is set-up just as you would during sun-light hours, with two exceptions:
1. The funnel is directed at the dark night sky. It should not "see" any buildings or even trees. (The thermal radiation from walls, trees, or even clouds will diminish the cooling effect.).
2. It helps to place 2 (two) bags around the jar instead of just one, with air spaces between the bags and between the inner bag and the jar. HDPE and ordinary polyethylene bags work well, since polyethylene is nearly transparent to infrared radiation, allowing it to escape into the "heat sink" of the dark sky.
During the day, the sun's rays are reflected onto the cooking vessel which becomes hot quickly. At night, heat from the vessel is radiated
outward, towards empty space, which is very cold indeed (a "heat sink").
As a result, the cooking vessel now becomes a small refrigerator. We routinely achieve cooling of about 20º F (10º C) below ambient air temperature using this remarkably simple scheme.
In September 1999, we placed two funnels out in the evening, with double-bagged jars inside. One jar was on a block of wood and the other was suspended in the funnel using fishing line. The temperature that evening (in Provo, Utah) was 78º F. Using a Radio Shack indoor/outdoor thermometer, a BYU student (Colter Paulson) measured the temperature inside the funnel and outside in the open air. He found that the temperature of the air inside the funnel dropped quickly by about 15 degrees, as its heat was radiated upwards in the clear sky. That night, the minimum outdoor air temperature measured was 47.5 degrees - but the water in both jars had ICE. I invite others to try this, and please let me know if you get ice at 55 or even 60 degrees outside air temperature (minimum at night). A black PVC container may work even better than a black-painted jar, since PVC is a good infrared radiator - these matters are still being studied.
I would like to see the "Funnel Refrigerator" tried in desert climates, especially where freezing temperatures are rarely reached. It should be possible in this way to cheaply make ice for Hutus in Rwanda and for aborigines in Australia, without using any electricity or other modern "tricks." We are in effect bringing some of the cold of space to a little corner on earth. Please let me know how this works for you.
Conclusion: Why We Need Solar Cookers
The BYU Funnel Cooker/Cooler can:
- Cook food without the need for electricity or wood or petroleum or other fuels.
- Pasteurize water for safe drinking, preventing many diseases.
- Save trees and other resources.
- Avoid air pollution and breathing smoke while cooking.
- Use the sun's free energy. A renewable energy source.
- Cook food with little or no stirring, without burning.
- Kill insects in grains.
- Dehydrate fruits, etc.
- Serve as a refrigerator at night, to cool even freeze water.
(Try that without electricity or fuels! See also Balancing the Scales.)
The burden for gathering the fuel wood and cooking falls mainly on women and children. Joseph Kiai reports from Dadaab, Kenya: "Women who can't afford to buy wood start at 4 am to go collecting and return about noon... They do this twice a week to get fuel for cooking... The rapes are averaging one per week." From Belize: "Many times the women have to go into the forest dragging their small children when they go to look for wood. It is a special hardship for pregnant and nursing mothers to chop and drag trees back to the village... they are exposed to venomous snakes and clouds of mosquitoes." (Anna K.) (Quoted in newsletters by Solar Cookers International.)
And the forests are dwindling in many areas. Edwin Dobbs noted in
Audubon Magazine, Nov. 1992, "The world can choose sunlight or further deforestation, solar cooking or widespread starvation..."
Americans should be prepared for emergencies, incident to power failures. A Mormon pioneer noted in her journal: "We were now following in their trail traveling up the Platte River. Timber was sometimes very scarce and hard to get. We managed to do our cooking with what little we could gather up..." (Eliza R. Snow) Now there's someone who needed a light-weight Solar Cooker!
Here's another reason to use a solar cooker. Many people in developing countries look to see what's being done in America. I'm told that if Americans are using something, then they will want to try it, too. The more people there are cooking with the sun, the more others will want to join in. A good way to spread this technology is to encourage small local industries or families to make these simple yet reliable solar cookers for others at low cost. I've used this cooker for three summers and I enjoy it. Cooking and making ice with the funnel cooker/cooler will permit a significant change in lifestyle. If you think about it, this could help a lot of people. The BYU Solar Funnel Cooker uses the glorious sunshine -- and the energy of the sun is a free gift from God for all to use!
Answers to commonly-asked questions
Will the cooker work in winter (in the United States)? As the sun moves closer to the southern horizon in the winter, the solar cooker is naturally less effective. A good measure of the solar intensity is the “UV index” which is often reported with the weather. When the ultraviolet or UV index is 7 or above– common in summer months– the solar cooker works very well. In Salt Lake City in October, the UV index was reported to be 3.5 on a sunny day. We were able to boil water in the Solar Funnel Cooker during this time, but we had to suspend the black jar in the funnel so that sunlight struck all sides. (We ran a fishing line under the screw-on lid, and looped the fishing line over a rod above the funnel. As usual, a plastic bag was placed around the jar, and this was closed at the top to let the fishing line out for suspending the jar.)
The solar “minimum” for the northern hemisphere occurs on winter solstice, about December 21st each year. The solar “maximum” occurs six months later, June 21st. Solar cooking works best from about March 20 - October 1 in the north. If people try to cook with the sun for the first time outside of this time window, they should not be discouraged. Try again when the sun is more directly overhead. (One may also suspend the jar in the funnel, which will make cooking faster any time of the year.)
It is interesting to note that most developing countries are located near the equator where the sun is nearly directly overhead all the time. Solar Cookers will then serve year-round, as long as the sun is shining, for these fortunate people. They may be the first to apply fusion energy (of the sun) on a large scale! And they may accomplish this without the expensive infrastructure of electrical power grids that we take for granted in America.
How do you cook bread in a jar?
I have cooked bread by simply putting dough in the bottom of the jar and placing it in the funnel in the usual way. Rising and baking took place inside the jar in about an hour (during summer). One should put vegetable oil inside the jar before cooking to make removal of the bread easier. I would also suggest that using a 2-quart wide-mouth canning jar instead of a 1-quart jar would make baking a loaf of bread easier.
What is the optimum “opening angle” for the funnel cooker?
A graduate student at Brigham Young University did a calculus calculation over two years ago to assess the best shape or opening angle for the Solar Funnel. Jeannette Lawler assumed that the best operation would occur when the sun’s rays bounced no more than once before hitting the cooking jar, while keeping the opening angle as large as possible to admit more sunlight. (Some sunlight is lost each time the light reflects from the shiny surface. If the sunlight misses on the first bounce, it can bounce again and again until being absorbed by the black bottle.) She set up an approximate equation for this situation, took the calculus-derivative with respect to the opening angle and set the derivative equal to zero. Optimizing in this way, she found that the optimum opening angle is about 45 degrees, when the funnel is pointed directly towards the sun.
But we don’t want to have to “track the sun” by turning the funnel every few minutes. The sun moves (apparently) 360 degrees in 24 hours, or about 15 degrees per hour. So we finally chose a 60-degree opening angle so that the cooker is effective for about 1.2 hours. This turned out to be long enough to cook most vegetables, breads, boil water, etc. with the Solar Funnel Cooker. We also used a laser pointer to simulate sun rays entering the funnel at different angles, and found that the 60-degree cone was quite effective in concentrating the rays at the bottom of the funnel where the cooking jar sits.


 A few years ago, I woke up to the fact that half of the world's peoples must burn wood or dried dung in order to cook their food. It came as quite a shock to me, especially as I learned of the illnesses caused by breathing smoke day in and day out, and the environmental impacts of deforestation -not to mention the time spent by people (mostly women) gathering sticks and dung to cook their food. And yet, many of these billions of people live near the equator, where sunshine is abundant and free. Ergo...
 The purpose of this paper is to summarize the basic principles that are used in the design of solar box cookers.


 As the density and weight of the materials within the insulated shell of a solar box cooker increase, the capacity of the box to hold heat increases. The interior of a box including heavy materials such as rocks, bricks, heavy pans, water, or heavy foods will take longer to heat up because of this additional heat storage capacity. The incoming energy is stored as heat in these heavy materials, slowing down the heating of the air in the box.
.jpg)


